Jamie and I ran the third line for the drip irrigation system yesterday. It's so simple to do and can save you so much time watering I wanted to show you guys some pictures. This post is a little long. Everything you need to do this you can find at the drip irrigation system section in Lowes or Home Depot. Or, for beginners you may want to just buy the little kits with everything you need to run you drip system for about 35 or 40 dollars. The kit was too small for our purposes so we just bought everything individually. We have hundreds of feet of lines running in our yard. The system can be as complicated or as simple as you like. Ours even fills the bird bath and waters the hanging pots. If you go with the kit, you can always add on to it later as you get use to what you are doing. It’s cheaper to just buy what you need. Look at the pictures on the back of the box; it will help let you know what to do and what you need.
This first picture shows the line running from our faucet to the yard. Our faucet has one of those inexpensive attachments on it that changes it from one spigot to four. It came with a timer kit we bought made by Orbit. It’s an extremely efficient system at a very affordable price and I highly recommend it. It can be found online or in your local big box store. I don't understand why, but you can get the same kit I've linked to for much cheaper in the stores than you can from the actual site, the link is to show you what we are using. We actually just bought a second one from Wal- Mart for about 25 dollars less. It can be just a tad bit tricky learning to program it, but after you learn how it’s set up you’ll realize how simple it really is to operate.***For those of you that are wondering I have no affiliation with the company I just really think this is a fantastic product and Jamie and I are very pleased with it’s performance.***
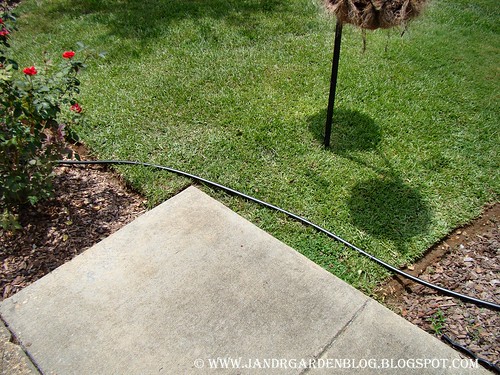
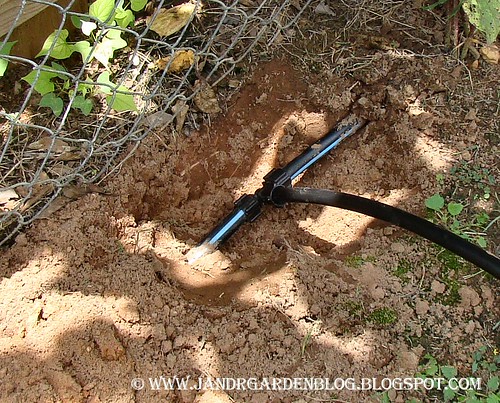
In this second photo you can see the half inch water line running into the bed and under the side walk. I had the foresight to think about running a section of line under the sidewalk when we put in these two beds. Then when we got ready to run the line all we had to do was to connect to it. It’s very simple to do. Just attach your water hose to a broom handle or pipe with some good tape, turn it on full force and keep pushing. Before you know it that water will wash away a small tunnel and you will be under the side walk in no time.
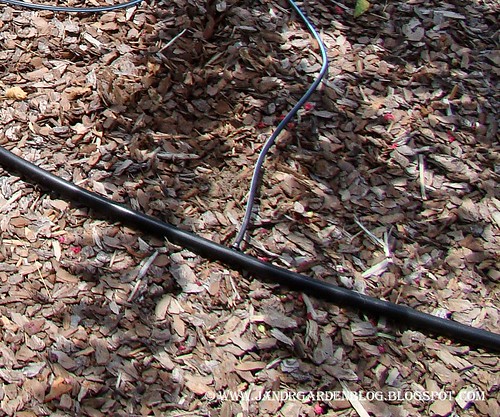
The quarter inch line that you use to run water to your drip emitters and sprinkler heads just snaps into the side of the line in a hole you make with a provided hole punch.
You just lay out your half inch tubing where ever you need water to go.


All the connectors just simply slide into the pipe. This takes a little strength. They come in T’s and elbows and two sided to connect two sections of line.
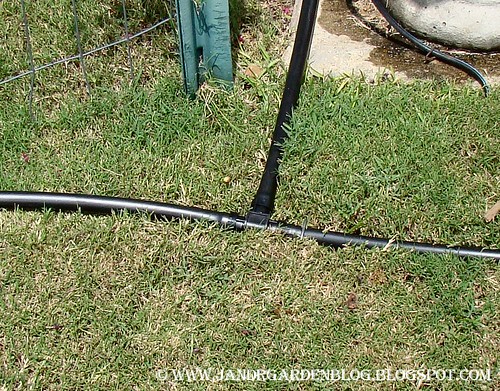
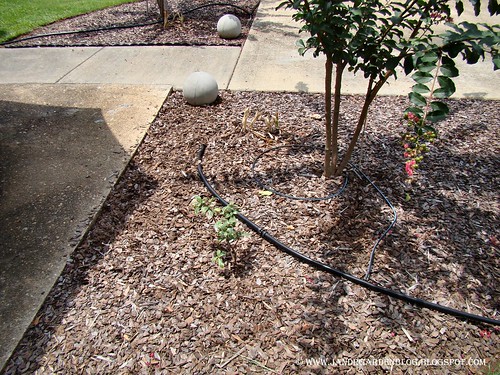
You can see the quarter inch line running to each plant here. It’s held in place by little plastic stakes that you can buy.

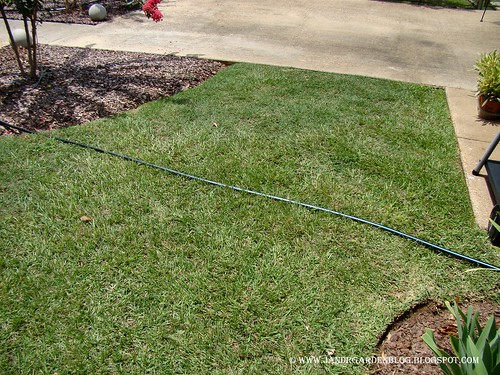
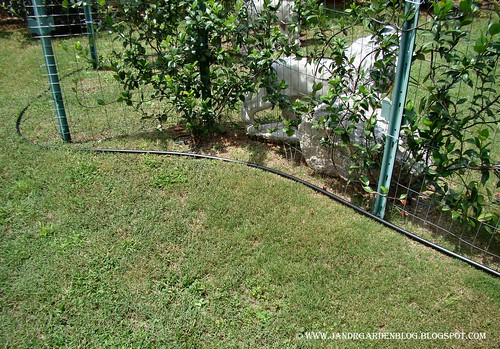
All that’s left to do now is bury the line. It doesn’t have to be deep; all you do is stick your shovel in the ground and lean it forward and back to wiggle open a little slit in the ground. Just push your hose into the little slot in the ground and step on the grass to push it back down when you are done. It’s barely detectable that anything has been disturbed and after a week you can’t even tell you buried a line. You just want it covered so the lawn mower can’t cut it or to hide if from view. You can see in the picture it’s about an inch or two deep in our yard. In the beds, just cover it with mulch and use landscape cloth pins or pieces of old wire hangers to hold it in place. The reason this is so dug up here is because we were tying into another line that was already buried.
For just a couple of hours effort, you can save yourself tons of hours standing in heat, dragging hoses. It’s the best thing we’ve ever done. If you need any help or need pictures of how to do something, just let me know. Jamie and I have become old pros at this.
Oh, one more thing you should know. The half inch line can only carry 244 gallons of water an hour. So if you are using sprinkler heads that put out 4 gallons per hour you can only use 61 heads, 10 gallon per hour – 24, drip emitters that put out 2 gph you can use 122. You can never put out more gallons per hour than the hose carries. Well you could, it just won’t work as well. It would be better to just run another half inch line to make another watering zone.
In other news Jamie and I have been researching the new lighting system we will be installing in the garden. It can be so confusing with so many types to choose from today. As luck would have it, I’ve been contacted by Teak, Wicker & More and I’m very excited to say they have asked me to do a review of a solar landscape lighting product for them, so look for the post to be coming soon. If you aren’t familiar with Teak, Wicker & More they have a very nice line of patio furniture and tons of other home and garden products.

28 comments:
You guys are so enterprising. I am most impressed by getting the tunnel under the sidewalk. Good to know as I have one out front that I may need to do this too. Installing drip irrigation is not easy. I spent over 2 hours installing a small premade kit in my hydrangea garden one year. I hated every minute of it. The stupid thing only lasted-one year then clogged and some emitters popped out. Urggg! Now I am thinking of doing another one on my impatiens tower. This info will help. I may custom make it like you all did. I've been eying those 4 spigot kits so I am glad to know you like them! I hope the solar lights work well for you. They've made so many advances. I have the hardwired ones here all over the yard. Not enough sun for solar ones here.
That is a great tip for getting the line under a walkway. I love the concrete or stone balls. I have my eye out for those. I want one as huge as I can get home.
Donna
Tina,
Unless you put a lot of emitters or sprinkler heads on there you need one of those inexpensive pressure regulators on each line, most come in 25 or 30 PSI which is what you need. Once you have more GPH going out, close to 244 gallons per hour you can take off the pressure regulator and it will be just fine. It’s also very, very important to put a backflow valve between the house faucet and the 4-way adapter. If you will put your emitters on a quarter inch line and use the three inch stakes on them they won’t clog and should last a couple of years. Also remember to flush your half inch line good by opening the end after everything is put together. It probably wouldn’t hurt to do this periodically. If you use the two way connector to attach the quarter inch line to the half inch you will notice one side is slightly longer than the other. Snap the long side into the half inch line or it will eventually pop out.
I’m curious to see how these lights are going to work. I’m glad we have the opportunity to test these out. I plan on making the post as informative as possible. :-) I’m going to email you this incase you don’t check back.
I checked back. I need to learn more on irrigation. It is one of those things I am most weak on and I am a bit embarrassed by it but your advice is sound and I'll refer back to it and maybe even email you if I have questions. I am tired of hand watering pots and stuff!
Donna,
Those concrete orbs are so expensive! I found a concrete statuary place and he had all these post caps lying around that he couldn’t sell because he forgot to put the wire in them and the ball could break off. I took a hammer and broke the square bases off of them and sat the balls on the ground. They were two dollars a piece. :-)--Randy
Tina,
We just have a lot of trial and error experience to fall back on. Feel free to email as often as you like. I check them very frequently and would be very happy to help.--Randy
I found a usefull link for making "Atlas Stones" the other day. They are the stones the professional weight lifters use in those crazy super human competitions. You can make one any size you like fairly easy though. the link is...
http://www.bodyresults.com/S2stone.asp
Best wishes, Glenn
Gleen, that's fantastic! Thanks!--Randy
Randy, you and Jamie have such a professional looking/sounding set up. I just drool when I see those neat edges on the flower beds. I just can't make myself do that and I think it looks so beautiful. Maybe one of these days...
Lisa,
Those edges really aren't that difficult to maintain. Every week when I cut the grass I just turn the weedeater sideways and trim them.:-)--Randy
Thanks, Glenn at B and J for the Atlas balls link and thank you Randy for the heads up.
Donna
You guys make wonders! My knowledge in irrigation is zilch. I considered doing a setup for my potted plants but I knew it wouldn't work as I have to constantly keep moving the pots due the problem with spiders, but I'm sure it'll be useful for gardeners who garden on land.
It was really informative, all the same :)
Very good explanation of how to install drip irrigation. After reading your instructions, I even think I could do this.
Jan
Always Growing
Wow, it's sort of like a big game of dominoes! I bet you're glad that job is done!
WOW you guys are amazing!! I am sure you save a nice chunk of change by doing it yourself. YOu will have so much free time by not having to water by hand you can start digging a new flower bed!
Can't wait to see how you like the solar lights. We bought a set this spring and I was surprised how well they worked. How long they last only time will tell.
Mouli-
Good to see you again! Thanks for the compliments!
Jan,
I’m certain you could do this, it’s very easy.
Monica,
It’s not hard to do, but anything that you’ve needed to do for a while and finally get it done make you glad it’s finished. :-)
Cliff,
It’s always good to see you! How’s everything been going at your place?--Randy
Are you planning on posting information regarding the research you are doing on the landscape lighting as well? There is a big difference between the home center brands and those that you can purchase from outdoor lighting distributors. Although, there is also a BIG difference in the price as well.
LSS-
I'll check out some of the distributors. Thanks for the tip. When we do install the complete lighting system I want to be sure we have the best product we can get for an economical price.--Randy
A lot of work but nicely done. We have a totally different kind of drip irrigation here. Or maybe that should be drip IRRITATION...way too much rain, fog and drizzle. On the other hand, no installation needed...
Great tutorial!
We have drip irrigation to the cottage garden, front pathway, waterfall garden, and fragrance garden. We laid only one drip at the bottom of the deer resistant garden and none in the butterfly garden. I haven't had to use the irrigation much this summer, but when I do need it, I wish that we had put it through the top of the butterfly and deer gardens. Temps should hit 100+ on Monday! It's really the containers that create too much watering work!
Cameron
Hi Randy (and Jamie too !)
This is what we will be doing as well for the gardens .. but first is one of the last steps .. the bricking of the beds and islands.
Then we will have the more permanent foundation to work around.
It will be almost heaven to have this type of system working for me .. no one in their right mind ever wants to drag a hose around in steaming weather ! The least of all a menopausal woman !!! LOL
PS .. so far "Little Count" the bat who visited me is not showing up again .. so far ! LOL
Joy
Hi Jand R, you guys are the most competent gardeners ever. You always do things the right way, kudos to you both! I want to share our method of making those concrete balls. Get a small beach ball, set it in sand to hold it still, cut a small piece out of the top, fill with mixed concrete. Let dry well, a week maybe. Peel off the rubber ball and voila!
Frances
Wow Randy... That is some undertaking you all have gotten involved with. I'm impressed. Your yard is gorgeous---and with that irrigation system, it will be even prettier... Keep us posted. You will have the prettiest yard in town.
Hugs,
Betsy
Very impressive guys!
Cameron,
I was just telling Jamie, that we probably use ours too much and should go farther between watering. It certainly does come in handy. I went to reset the timers on them and some point they had been accidently changed to water every day. And I don’t know how long they’ve been set like that. 750 gallons of water a day, I shudder to think what our water bill is going to be.
Joy,
Jamie and I have been discussing the possibility of bricking our bed borders at some point. I think brick is a very, very attractive border.
Frances,
That sound pretty easy to do, we may very well give that a try. Hopefully Donna will see your comment too. :-)
Betsy,
Thank you very much! Jamie and I have done this before; we probably have at least a thousand feet of water lines running in our yard. It has been such a blessing these past couple of years.
Thanks you, Wayne! :-)
OOOps! Jodi, sorry I missed you in the mix catching up on comments! I'm glad you paid us a visit!
Raingardener? Where did you get off to? Such a nice post why did you delete it. :-)--Randy
It looks so esy, but hen I get to thinking about it my head spins, lol. The house already came with a basic one that gets most of the areas that aren't grass anymore. Some I still have to water though.
Jake
Jake it really is very easy and the more of it you put down the faster it goes.:-)--Randy
Post a Comment