When we first started the garden and things really started to develop I wasn’t particularly pleased with how visible everything is to the outside world. I want our guest to have a delightful surprise when they entered the back yard and a chain link fence just doesn’t provide a lot of privacy. Our first consideration was of course a privacy fence and I would love to have one. The only problem is the expense. We could afford it as a one time investment, but no matter how well you maintain it with some type of sealer, sooner or later it’s going to have to be replaced. With a yard the size of ours we are talking about an expense of several thousand dollars, so that wasn't an option as far as I’m concerned. We moved on to our next option which was a living screen of plants. This idea worked well for the back fence and the side yard, but I was perplexed about what to do for the largest section of the front fence to provide some sort of seclusion. Nothing I considered in the way of trees and shrubs seemed to work and I was getting really frustrated. Then one morning I woke up at four am and had an immediate vision of a small courtyard with an arbor and a trellis wall that would form the entrance to our garden. I got up out of bed and proceeded to draw it out on paper and this is what I came up with.
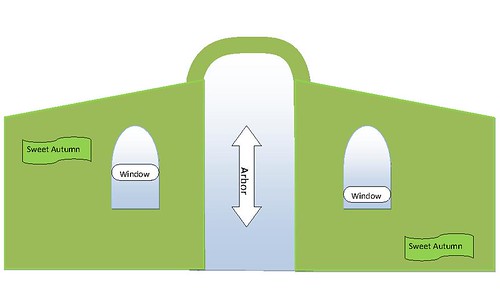
I’ve had so many messages about the wall, trellises and arbors I’m going to show you how we built them. Hopefully when you are done reading, you will have learned how to build an attractive and sturdy 7.5 x 4 foot trellis for under $14.00 and a 4 x 4 x 8 foot arbor for $30.00, both made out of steel. For these projects you will need some 6 foot metal U-post, a roll of 4 foot welded wire, a few nuts and bolts, some aluminum chain link fence ties, wire cutters, pliers and a common head screw driver. I also HIGHLY recommend you buy a post driver. This tool will be a one time investment, it only cost about $18.00 and it makes building these items incredibly easy. This is what it looks like and you can find them almost anywhere they sell chain link fencing. I got mine and all the other things you need at Home Depot. You simply stand the post up, slide this tool over the top of it, hold it by the handles and start pounding your post in the ground. The top of the diver is solid steel and heavy so it drives the utility post in the ground really fast. With one of these post drivers you can build a trellis like ours in about ten or fifteen minutes. Don’t forget to call before you drive the post in the ground so you are certain you don’t cut thru any buried utilities.

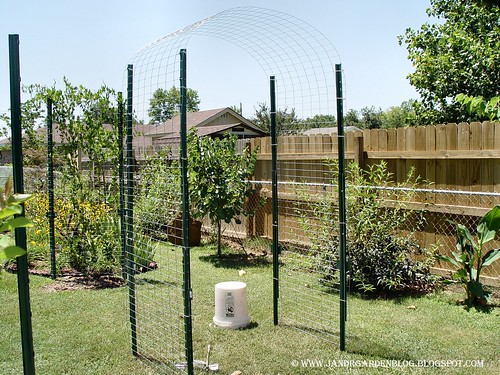
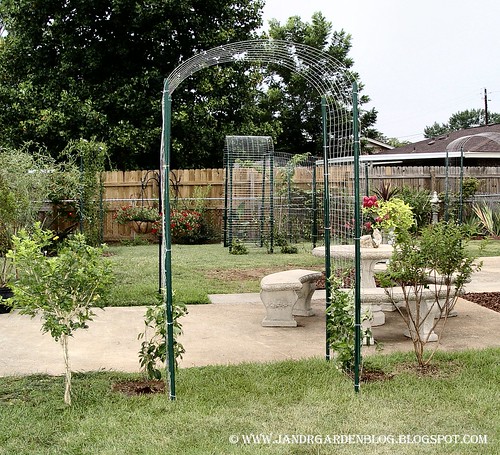
For now, we are going to start off with the Garden Wall we made and from it you will learn to build the arbors. I’ve found that in most cases arbors are four feet wide, so that’s the dimensions we decided to go with for ours. The welded fencing is also four feet wide so to begin, you want to measure out a 4 x 4 foot box on the ground where you want your arbor to be. Face the box as if you are about to walk thru your new creation. Drive a post in the ground in each corner of the box. On the left side you want the U-post parallel, with the flat side facing inward and the rounded side facing out, both turned in the same direction. Do the same for the right side of the Arbor. When you are driving the post into the ground, don’t forget to look after a couple of blows and check that your posts are going into the ground straight. I usually drive my post in the ground about a foot and a half or until the first tab on the post is about even with the surface of the earth.
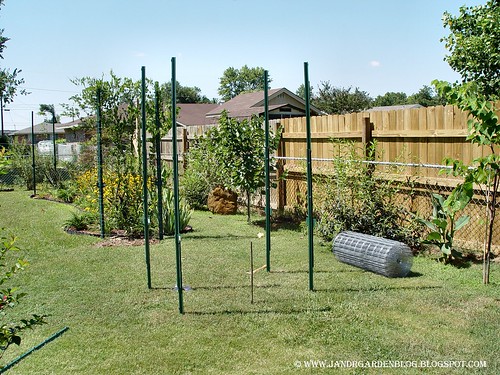
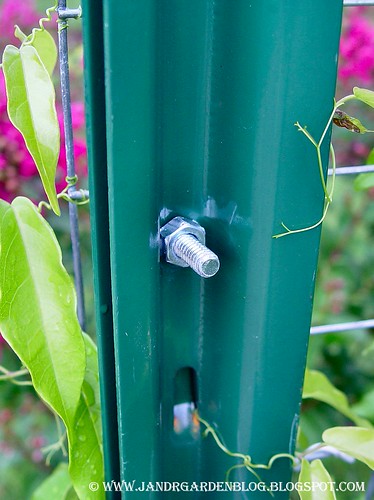
Looking at the above picture you will notice that the posts are obviously higher than six feet. Take another post and place it on the inside of the one driven into the ground lining up the two bottom holes of the top post with the two top holes of the bottom post. You will see that you have a pretty good bit of overlap, but that’s okay. Now place a bolt thru one of the holes from the rounded side of the post, I recommend bolts that are one and a quarter to one and a half inches long. That way it’s easy to start the nut with your fingers but still short enough it doesn’t stick out very far from the post. Do the same with the second hole.
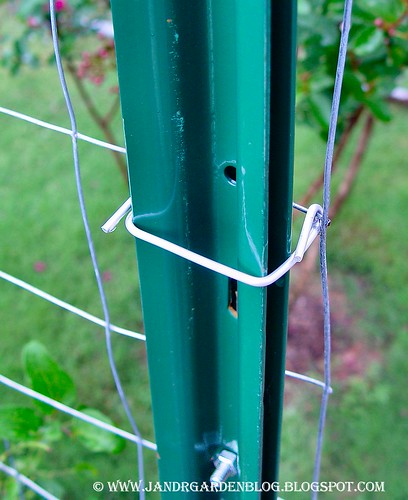
The next part will be a lot easier if you have some one to help you do it. Roll out about twenty feet of the wire, but don’t cut it off the roll. Drape the wire over the four posts. At this point it’s useless to try to shape your arbor much; you just want to be sure that the free end of the wire touches the ground on one side of it. Remember how we drove the post into the ground until the first tabs were even with the earth? Well now you can use those tabs to anchor the end of the fencing to the posts. You may have to pry them open a tad with the screw driver. Don’t pull on the fence really hard though, I’ve found the first row of welds tends to break rather easily if too much pressure is applied to them and you don’t want to do that. It won’t hurt anything if you do, it just makes it easier to keep your fencing even and straight if the tabs hold it in place. Completely attach one side of the arbor with wire ties. I’ve found that the aluminum ties they make for chain link fencing is perfect for this. They are the correct length and strong, but soft enough to twist with your fingers.
Now that you have one side of the arbor attached you can roll out more fencing and slide it up and down on the opposite side to adjust the arch on top to the shape you like. When you are satisfied, cut the wire from the roll at ground level, use the tabs to hold it in place and tie the fencing to the post. Now you have your new arbor. If you make the arch of the arbor too tall is tends to get a little flimsy and may collapse from the weight of a large vine. I have already figured out a solution to this problem and I will be posting it soon. Meanwhile, plant your vines on your new arbor and let them be growing. The great thing about this it the trellises are made basically the same way. You just start with the wire at the top of the posts and cut it off at ground level.
In this picture you can see where we started building one side of the wall that connects to the arbor. Same basic principles, drive the post in the ground and attach the fencing to them. The tricky part was the top. The bottom sections of wiring were simply rolled across and sewn together with pieces of wire. We actually cut off the outer wire leaving all the wire ends loose, then we overlapped the wire by one frame and used the loose ends to weave the fencing together. It made a perfect seam. For the top, we kept the side of the wire even with the top of the post and cut off the excess that hung over the second row.
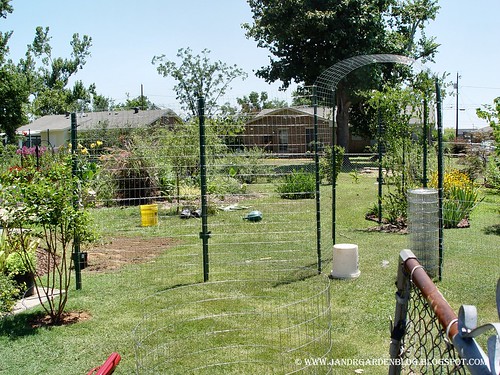
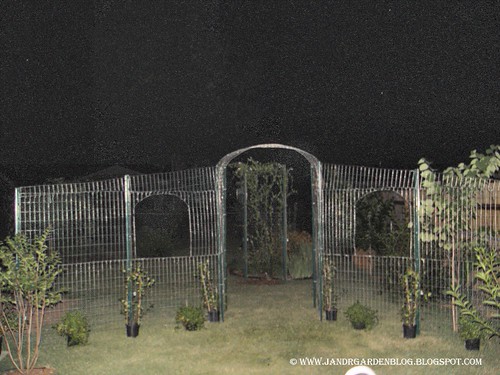
Here’s the finished project. This picture is not the best because it was taken at night. The quality may be poor, but the flash made the fence light up nicely and shows off the detail. We cut out windows on both sides and I framed them up with the pieces of outer wire I cut off the sections used to construct the wall. At this point the vines hadn’t been put in the ground yet. We decided to use confederate jasmine on the wall instead of Sweet Autumn. It’s just a tad more cold hardy, plus we placed Sweet Autumn on another arbor that serves as an alternative entrance to the little courtyard. Next spring and summer the scent is going to be absolutely heavenly and I can’t wait for the vines to completely cover the wall.
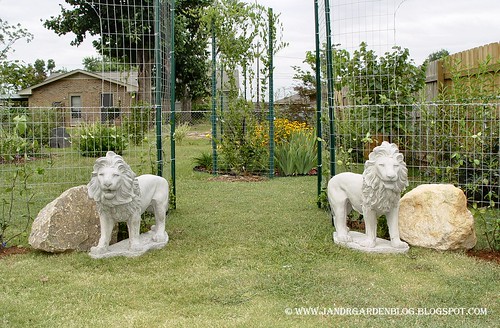
I think most of you will remember when we got these Lions a couple of months back. The idea when we purchased them was that they would be used at the entrance of the garden even though when we got them we weren’t sure how or where. So here they are in their new home, I have to admit I miss seeing them at the end of the patio. They made perfect stools to sit on in the mornings and watch the humming birds around the salvia. Eventually they will find themselves sitting a bed of green, most likely made of Mondo Grass, that will extend on both sides of the wall.
When arbor and wall were finished I realized that the view thru the arbor showed the trellis behind it and it was a perfect spot for a focal point. I’ve wanted an obelisk now for a very long time and I haven’t been able to find one. While we were visiting Phillip’s garden in Florence I noticed he had THE most beautiful obelisk that had been hand carved from stone. It was wonderful and I just absolutely had to have one to go in front of that trellis. Phillip told me on my next visit we would go to the person that made them and I could look at the obelisk and all the other stuff he designs. When Phillip and Michael arrived to see that garden a couple of weekends ago they came bearing a gift, my obelisk! Jamie and I were beside ourselves in excitement. It was such a very generous and unexpected gift and something that will remind us of their first visit for many, many years to come. The generosity of gardeners never ceases to amaze me. Phillip has a better view posted on his blog and you can see it here.

This second arbor is the one I was speaking of earlier. It’s the alternate entrance to what will eventually be the little courtyard. It has ‘Sweet Autumn’ Clematis planted on each side and I’m sure it will fill in quickly. Also planted on each side of the arbor are ‘Tonto’ Crepe Myrtles. They’re small crepes that only get about fifteen feet tall and ten feet wide. We are going to keep them limbed up high enough that they simply cascade over the trellis and the roofline. It will be a little work to train them in the shape I want, but I’m always up for a challenge and I think the final out come will be fabulous. You can see the “Garden Wall” to the left. Everyone that comes to our house uses the back door to enter. Can you imagine the wonderful scent that will greet them? A twenty three foot wall of Confederate Jasmine that blooms spring thru late summer and an arbor filled with ‘Sweet Autumn’ in the late summer and fall.

This final arbor leads from the Patio to one of the grass paths. It has 'Tangerine Beauty' planted on it and it’s growing rapidly. If you have one planted you should watch the way the little fingers of the vine hold things. First they grab something then they actually pull the vine close to what they have found. It just amazes me… Aaaaaahhhh.... Mother Nature.
If you have any questions about the way we built any of these arbors or trellises please don’t hesitate to ask. I’ll be glad to answer any and all questions the best I can. Thanks for visiting us! :-)

18 comments:
absolutely lovely garden.
GardenGoose,
Welcome! We are so happy you chose to pay us a visit and thank you for your compliment! BTW- Happy Birthday to you and your husband a couple of days late. Hope your 4-0 was a wonderful one!
-Randy
Yaaahhh, you're back. Great job Randy and excellent advice! So glad y'all like the obelisk. :)
First of all, I really like that obelisk! Your directions are very good. Even the severely 'construction challenged' like myself can follow them. I would love an arbor like that to grow beans on. So easy to pick from underneath.
Marnie
Just wonderful, you two. How is your back?
Looks great. That was a very nice gift of the obelisk. VERY nice!
Randy, you should do a gardening show! Your instructions are so clear and your results are so lovely. I can't wait to see your wall fill in. Is Sweet Autumn evergreen there? Here, it's pretty lush until frost, but then it loses all its leaves--I usually cut it back in the winter.
Marnie,
Isn't it just wonderful, we absolutely love it. We think of them everytime we walk out the back door and that's the only one we use to leave the house. :-)Well, you can build that bean arbor for about $30.00. The smallest roll the fencing I've seen is 50 feet and it's about $30.00 too, but you can make exactly seven trellises out of it or about three arbors. I'm glad you like the idea.
Tina, I think I've said this before, but Phillip and Michael are two of the most wonderful kind hearted people you will ever meet.
Oh nooooooooooooooooo Cosmo, they say the camera adds ten pounds to you and I'm already 20 pounds over weight, I can't have that! Thank you though! This is the first time we've grown Sweet Autumn so I don't know what to expect. I've been told the leaves get a little ratty but make it thru the winter. That's why we chose to go with Confederate Jasmine on the wall. We will just have to wait and see. If we have to cut it back that will be fine, it will stay out of the Crepe Myrtles that way and I'm sure the larger the root structure is the faster it grows in the spring and summer. Is that correct?
Sorry, I'm still voting for you for whatever we might call this garden show that gardeners REALLY want to see. I struggle with the extra pounds myself (thank goodness for gardening), but I bet you look FABULOUS--I'm tired of watching emaciated people on TV. Someday I'll tell my story about stepping on Robert Redford's foot (1973, btw).
ANYWAY, yes, the Sweet Autumn loses its leaves where we are, but it's vigorous and once established comes back very quickly. The books suggest that you don't have to cut it back, so maybe just see how it looks--cutting it back here makes it lush all the way up--if I didn't cut it back, it would be really leggy and sparse at the bottom. But oh, the fragrance . . .
Randy, you are a true blogger to have documented the process from start to finish. What an amazing construction! I hope you'll continue posting about it as the jasmine fills in so we can see the progression from vision to reality.
Thanks for sharing your creativity with us.
Pam,
We are so happy you paid us a visit! I will certainly keep posting about the wall. It still has a tremendous amount of work to be done to it, actually that entire little area does, so you'll get to see it as it grows. And, to be called a "true blogger" from you is certainly a compliment. :-)
Using moderately priced green walls instead of expensive wooden privacy fence is brilliant from both an economic and a design standpoint.
Your step-by-step instructions are clear ... skip TV and go right to how-to videos on YouTube! I'll subscribe to your station ;-]
Annie at the Transplantable Rose
Hi R and J, I have read several of the last posts and your gardens are fabulous, but my first thought was, what grass will be dug up next? And you answered that question LOL. You have done a great service to us all with those excellent instructions on making a wall and trellis with a modest amount of expense and even labor. I was wondering how you were going to make the wall in the drawing, so professional BTW, with block and mortar? Not cheap or easy. Your way was perfect. You will have that privacy in no time and the bonus of fragrance. You are so smart. I like Annie's idea, straight to youtube!
Frances
new url
http://fairegarden.wordpress.com/
Fantastic idea for the arbors, not only clever but good looking and sturdy. The obelisk is wonderful.
Gail
Frances, always glad to have a visit from you! I can't wait for the wall to fill in and see just how fragrant it will actually be.
Gail I have some more ideas to share with you guys. Hopefully I can get some order back to my life soon. Thank you for checking in on us. :-)
HI Randy and Jamie, Just to let you know that the post is up showing your lovely necklace. Again, thanks for your thoughtful and beautiful gift.
Frances
http://fairegarden.wordpress.com/
This wall made of fencing is brilliant.
I have used those fence posts to erect a wooden trellis that is supposed to be mounted on a wall. It is at one end of our patio. It has been there for probably 10 years. It is still very sturdy. You will love your wall of perfume when it grows in.
Lisa,
Welcome to our blog! And, thank you so much for the compliments on the wall. It's reassuring to know that your trellis has been up for so many years. I have a surprise coming about the wall, but I don't want to say anything just yet. :-)-Randy
Post a Comment